How We Set Up Our Backyard Bee House for Native Pollinators
🐝 Welcoming Bees to Our Backyard: Unboxing the Bee House
We’ve been working on this year’s backyard habitat and have been focused on creating a welcoming pollinator paradise. This week we added a charming little bee house to help give native bees a cozy place to call home.
If you’re trying to attract pollinators, adding a bee house is a great way to support native pollinators. Whether you’re just starting a pollinator garden or looking to expand one, these little shelters provide native solitary bees with a safe place to nest and can help attract solitary bees that are essential to local ecosystems.
🌼 Choosing the Right Bee House
When choosing a bee house, it’s important to consider the types of solitary bees native to your region. Many of these pollinators—like the mason bees and leafcutters we have here in Central Florida—prefer nesting in hollow tubes that mimic natural cavities found in wood or plant stems. A good bee house should offer a mix of tube diameters and depths to support different species and encourage broader activity. Tube depth matters too—deeper tubes offer better protection from predators and weather, and different bees prefer different nesting lengths.
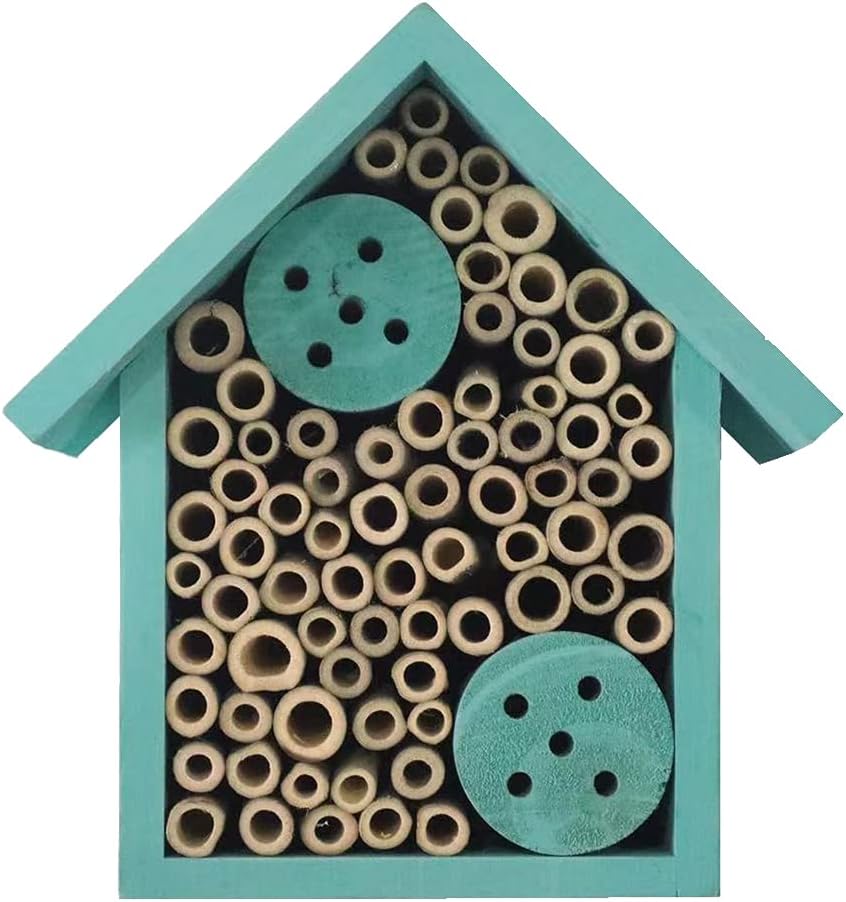
We went with the Egree Bee House from Amazon because it includes a variety of tube diameters and depths, which helps support the needs of multiple bee species, especially those native to our region. Plus, it’s really cute!
📍 How to Set It Up
To give your bee house the best chance of success, you’ll want to hang it in a location that:
- Faces East – Bees are more likely to nest in a house that catches the morning sun, which helps warm them up and gets them active early in the day.
- Is Sheltered from Rain – A covered spot like under a roof overhang helps keep the tubes dry and free from mold.
- Sits at Least 3–5 Feet Off the Ground – This protects it from ground moisture, animals, and provides better air circulation.
🐝 What We Did:
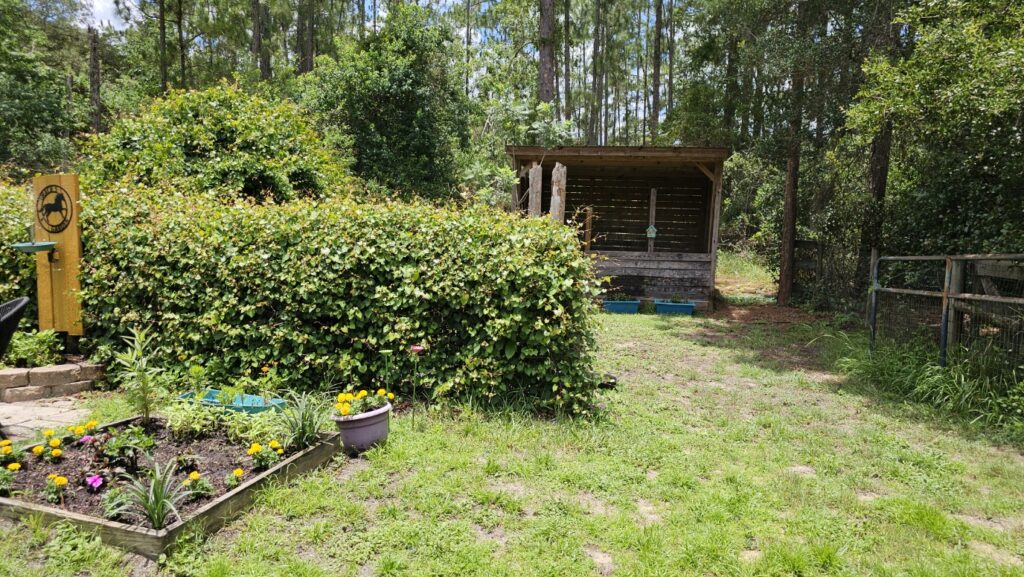
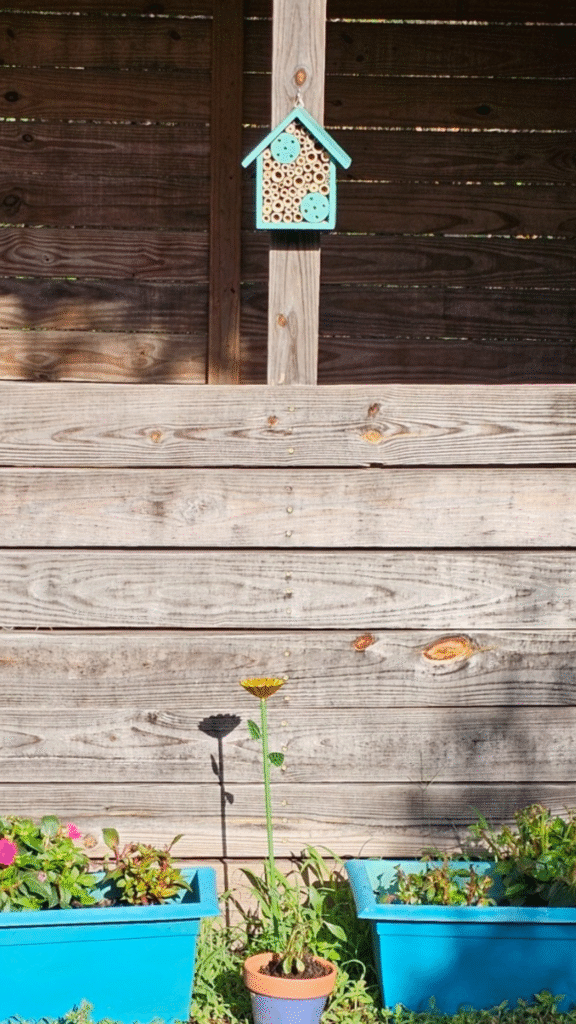
We had the perfect place to hang ours. It’s mounted to an east-facing post of our run-in shed—it’s bathed in morning sun and under cover of the roof, so it will stay pretty dry.
It’s nestled above some colorful planters with pentas and impatiens, plus we added some cute flower shaped bee waterers nearby to round out the pollinator-friendly setup.
🧼 Caring for Your Bee House
To keep your bee house safe and welcoming, regular cleaning is key. Over time, debris, parasites, and moisture can build up in the tubes, making them less attractive—or even harmful—to future bees.
🧽 Clean Before First Use:
Even if it’s brand new, your bee house may have dust, debris, or residue from packaging. A quick clean helps ensure it’s a safe and inviting place to nest.
🧽 Clean Between Seasons:
At the end of each nesting season (usually fall), gently remove and clean the tubes using a small bottle or straw brush. If the tubes aren’t removable, consider replacing them if possible, or carefully scrub them in place.
🌞 Let It Dry:
Always let everything dry fully before putting it back together. Moisture can lead to mold, which is dangerous for bee larvae.
🪵 Use Natural Materials:
Avoid harsh cleaners—plain water or a mild vinegar rinse is best. Bees are sensitive to chemicals and fragrances.
🐝 What We Did:
We used brushes that came with metal straws and our cat fountains. The variety of sizes worked perfectly for the different size tubes in the house.
🎥 The Video
👉Here’s the unboxing video showing the bee house and where we hung. We’ve even already seen a bumblebee and others on our patio!
🛠️ Products We Used
Here are a few of our favorite finds from this setup:
- Rustic Bee House
- Bottle Brush for Cleaning Tubes
- Metal Flower Waterer
- Planters – Similar Style on Amazon
- Pollinator Seed Pack
- Pentas (check local nurseries or garden centers
- Impatiens (also local garden centers)
(View the video with full Pollinator Paradise Product list on Amazon)
🐝 Tips for Success
- Choose a house that has a variety of depths and widths of tubes
- Mount your bee house facing east for morning sun
- Hang it 3-5 feet high.
- Place it under shelter to protect from rain
- Keep the area around it active with flowers and shallow water
- Clean the tubes between seasons with a small bottle brush to prevent mold or disease
📌 Love This Post?
Help us spread the buzz!
Pin it, share it, or tag us if you create your own pollinator spot — we’d love to see it.
This post is part of our BearBunk Backyard Habitat Series. Explore more on pollinators, water features, and natural gardening on the Habitat tab!
Let’s make our outdoor spaces croak, chirp, buzz, flutter, and thrive — one backyard at a time. 🌸🐝
More from the Backyard Habitat Series:
Stay tuned for more DIY tips, habitat upgrades, and ways to support the wild ones who share our world. 🐾🌿

Our Backyard Habitat – A Garden for Wildlife and Pollinators
Wildlife Friendly Backyard Habitat This Year’s Wildlife Habitat and Garden Glow-Up Every year, we try…

Backyard Wildlife Watching Guide: How to Spot Animals in Your Own Backyard
Wildlife Friendly Backyard Habitat Backyard Wildlife Watching Guide If you’re building a wildlife-friendly backyard, one…

How We Set Up Our Backyard Bee House for Native Pollinators
Preview in new tab Wildlife Friendly Backyard Habitat 🐝 Welcoming Bees to Our Backyard: Unboxing…

Welcome Frogs, Toads, and Lizards to Your Backyard Habitat
Wildlife Friendly Backyard Habitat How to Create a Safe, Natural Habitat for Frogs, Toads and…

Gracie’s Garden: Our Almost-Ready Pollinator Paradise
Wildlife Friendly Backyard Habitat Want to attract more bees, butterflies, and hummingbirds to your yard?…

Wildlife Shelter 101: How to Create Safe Spaces in Your Backyard
Wildlife Friendly Backyard Habitat Creating Safe Spaces in Your Backyard Building a wildlife-friendly backyard is…
Affiliate Disclosure
BearBunk may earn a small commission from purchases made through Amazon affiliate links, at no extra cost to you. Thank you for helping us help animals thrive.
Leave a Reply